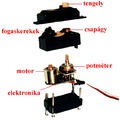
Arduino bekötése: Potméter A0-ba

ARDUINO KÓD
void setup(){
    Serial.begin(9600);
}

void loop(){

 int val = analogRead(0);
   val = map(val, 0, 300, 0, 255);
    Serial.println(val);
delay(50);
}
PROCESSING KÓDOK
1/
import processing.serial.*;

Serial myPort;  // Create object from Serial class
static String val;    // Data received from the serial port
int sensorVal = 0;

void setup()
{
  fullScreen(P3D);
  noStroke();
  fill(204);
  String portName = "COM5";// Change the number (in this case ) to match the corresponding port number connected to your Arduino.

  myPort = new Serial(this, portName, 9600);
}

void draw()
{
  if ( myPort.available() > 0) {  // If data is available,
  val = myPort.readStringUntil('\n');
  try {
   sensorVal = Integer.valueOf(val.trim());
  }
  catch(Exception e) {
  ;
  }
  println(sensorVal); // read it and store it in vals!
  }
  noStroke();
  background(0);
  float dirY = (sensorVal/ float(height) - 0.5) * 2 * -1;
  float dirX = (mouseX / float(width) - 0.5) * 2;
  directionalLight(204, 204, 204, -dirX, -dirY, -1);
  translate(width/2 - 100, height/2, 0);
  translate(200, 0, 0);
  sphere(200);


  fill(255);
  ellipse(random(width), random(height), 3, 3);

}
2/
import processing.serial.*;

Serial myPort;  // Create object from Serial class
static String val;    // Data received from the serial port
int sensorVal = 0;

void setup()
{
   size(720, 480);
  stroke(255);
  noFill();
  String portName = "COM5";// Change the number (in this case ) to match the corresponding port number connected to your Arduino.

  myPort = new Serial(this, portName, 9600);
}

void draw()
{
  if ( myPort.available() > 0) {  // If data is available,
  val = myPort.readStringUntil('\n');
  try {
   sensorVal = Integer.valueOf(val.trim());
  }
  catch(Exception e) {
  ;
  }
  println(sensorVal); // read it and store it in vals!
  }
 background(0);
  for (int i = 0; i < 200; i += 20) {
    bezier(sensorVal-(i/2.0), 40+i, 410, 20, 440, 300, 240-(i/16.0), 300+(i/8.0));
  }

}
3/
import processing.serial.*;

Serial myPort;  // Create object from Serial class
static String val;    // Data received from the serial port
int sensorVal = 0;

void setup()
{
   size(720, 480);
   noStroke();
  noFill();
  String portName = "COM5";// Change the number (in this case ) to match the corresponding port number connected to your Arduino.

  myPort = new Serial(this, portName, 9600);
}

void draw()
{
  if ( myPort.available() > 0) {  // If data is available,
  val = myPort.readStringUntil('\n');
  try {
   sensorVal = Integer.valueOf(val.trim());
  }
  catch(Exception e) {
  ;
  }
  println(sensorVal); // read it and store it in vals!
  }
 background(0);
  // Scale the mouseX value from 0 to 640 to a range between 0 and 175
  float c = map(sensorVal, 0, width, 0, 400);
  // Scale the mouseX value from 0 to 640 to a range between 40 and 300
  float d = map(sensorVal, 0, width, 40,500);
  fill(255, c, 0);
  ellipse(width/2, height/2, d, d);

}
forrás: https://www.arduino.cc/education/visualization-with-arduino-and-processing/
Processing leckék https://processing.blog.hu/


